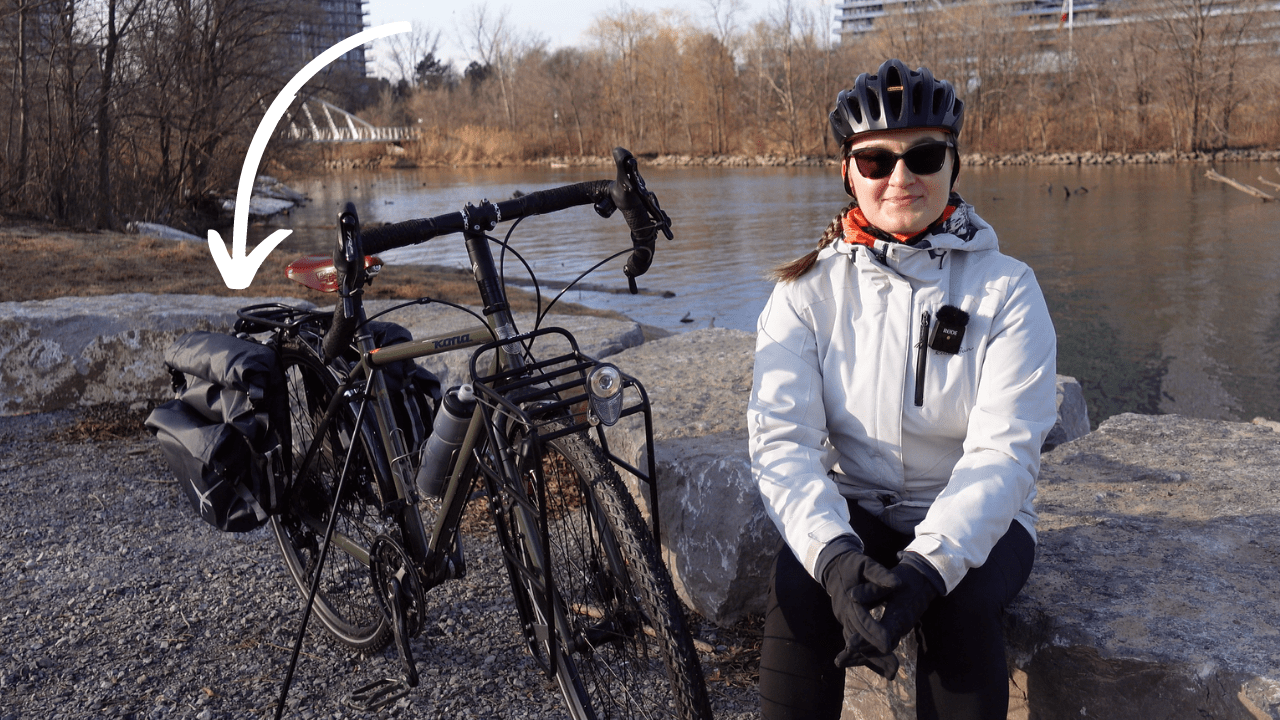
Upgrades I Made to My Touring Bike to Get It Ready for the Touring Season
Spring is just around the corner and in the Northern hemisphere, this means that the touring season is quickly approaching. With that, I made a number of upgrades to my 2021 Kona Sutra Touring bike. Watch the video to find out what changes I made.
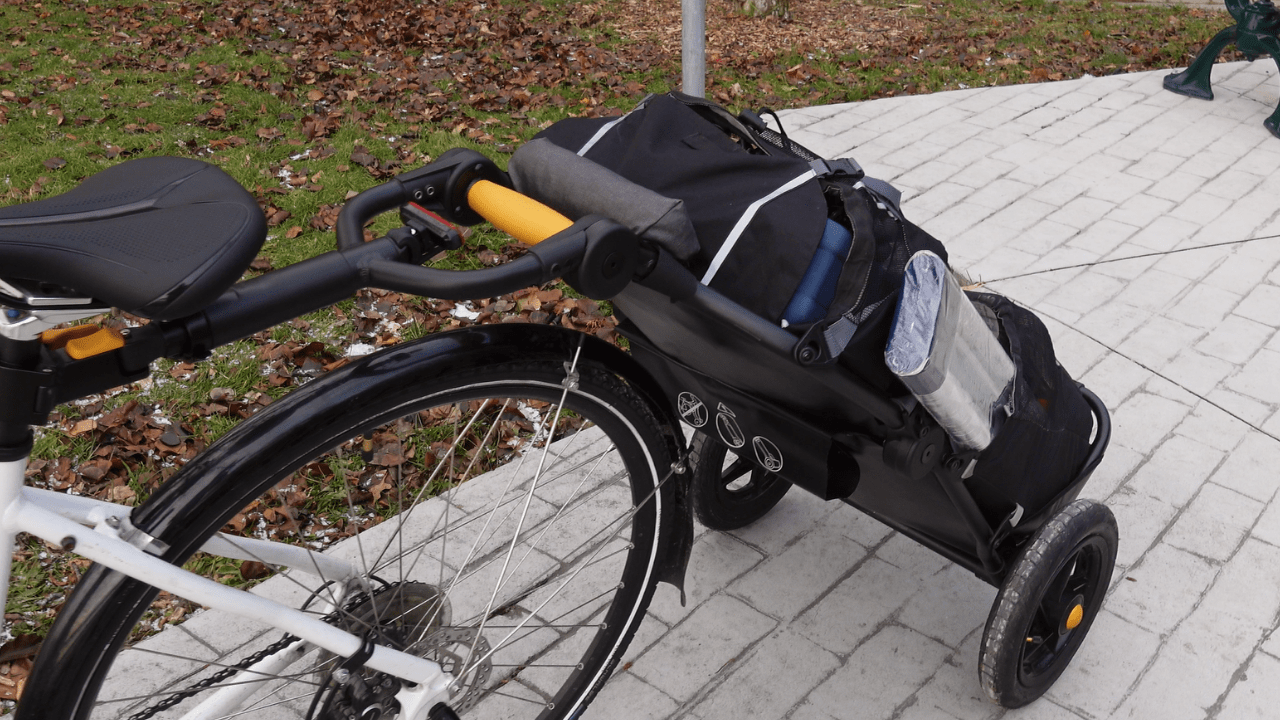
The purchase of the Burley Travoy bicycle trailer singlehandedly maximized my car-free lifestyle. The first time I spotted it, a lady pulled up to a local health food store, unhitched the trailer from her bike, lowered the attachment arm and rolled the (now) shopping trolley inside the store. Meanwhile, I was fiddling with my panniers, awkwardly carrying them with me inside the small space, attempting to do some shopping.
I asked her about the trailer, what she thought about it, and as is typical of most Burley Travoy owners I’ve ever spoken to – she told me why she LOVED it.
I bought my trailer in early 2020. I bought the upgraded 2020 version and then purchased the upper and lower market bags to optimize my shopping experience. I’ve since used the trailer to do grocery shops, to carry large and small boxes and to haul items around. I recently used the trailer to carry items I had to clear out from my desk at work in preparation for a move to a new building.
Grocery Shopping by Bike (with the Burley Travoy trailer)
The Travoy is a folding bicycle cargo trailer with a towing capacity of 60 lbs. The Travoy is versatile. You don’t need the market bags to make it work. The trailer comes with two straps that can be used to secure various items on the trailer. If you are a maker, you can 3D print the attachment clips and then sew your own bags – this will save some money as you certainly pay for the Burley quality. In my opinion, it’s money well spent.
The trailer attaches to the seat post, as opposed to the wheel axel, using a quick hitch. The quick hitch is adjustable and will fit most seat posts. This is excellent as you can easily attach the trailer to various bikes in seconds. If you have access to a Bike Share bike, it’ll most likely work with those as well.
If you live in a smaller space and would like a trailer that folds down to a small, compact size, a trailer that can easily be stored in a closet – then consider the Burley Travoy bicycle trailer.
If you own the trailer, let me know what your experience with it has been like.
Happy riding!
⚠ Some links in this post are affiliate links, which means that I will get a small commission if you make a purchase. This is at no additional cost to you.
Best Panniers? 5 Things to Consider When Buying New Bicycle Panniers for Touring or Commuting
When I was brand new to the world of bicycle touring and commuting I had no idea what to pay attention to when buying new bike bags. I just went on Amazon and purchased a set of panniers with relatively good reviews. I wish I watched a view or two, as it would’ve saved me some money in the long term. But … we live and learn.
Here’s my attempt at demystifying the process for those new to the world of commuting and exploring by bike.
Intended Use
What are you going to be using the panniers for? Commuting or touring? An average commuting distance (based on my unscientific poll on Reddit) is about 13km/8mi one way, which translates to about 130km/81mi weekly (5 days).
My question posted on the Bike Commuting community on Reddit
While on tour, you could ride that distance in a day, which means that your panniers are exposed to a lot more wear and tear while on tour, than when commuting. This brings us to the second point, durability.
Material, Durability and Waterproofness
Typically bicycle panniers are made from nylon or polyester materials. Some panniers have an additional coating added to make them more durable, or waterproof. There’s an ongoing debate on whether you need waterproof panniers. Personally, I used water-resistant panniers for commuting – they came with a waterproof cover, and switched to waterproof panniers for touring. There are pros and cons to everything and here are a few points to consider when “engaging” in this debate:
Pros
Cons
keep water out
can trap moisture inside the pannier leading to mould formation
no need to fiddle with external covers (which are easy to misplace)
material may not be breathable, leading to moisture accumulation and mould
streamlined design with some internal organization
lack of organizational components – external pockets
will protect expensive gear from water damage
can be expensive
water beads off the material and doesn’t soak the pannier
depending on material and design – can get heavier if water seeps through the top layer and is trapped between the top and the waterproof layers of the material
Pros and Cons of waterproof panniers
Capacity and Design
How much space do you need? Panniers typically come as a set of two, typically, but not always. A 30L pannier system consists of two 15L bags. It’s difficult to know exactly how much space you might need, especially if you are just starting out. A 30L pannier set would work well for commuting purposes. If you are more of a minimalist, then 25L panniers are an option as well.
While material contributes to the durability of the pannier, the overall bag design does as well. Cheaper, budget panniers will start showing wear and tear faster and the added reinforcement components will not be available.
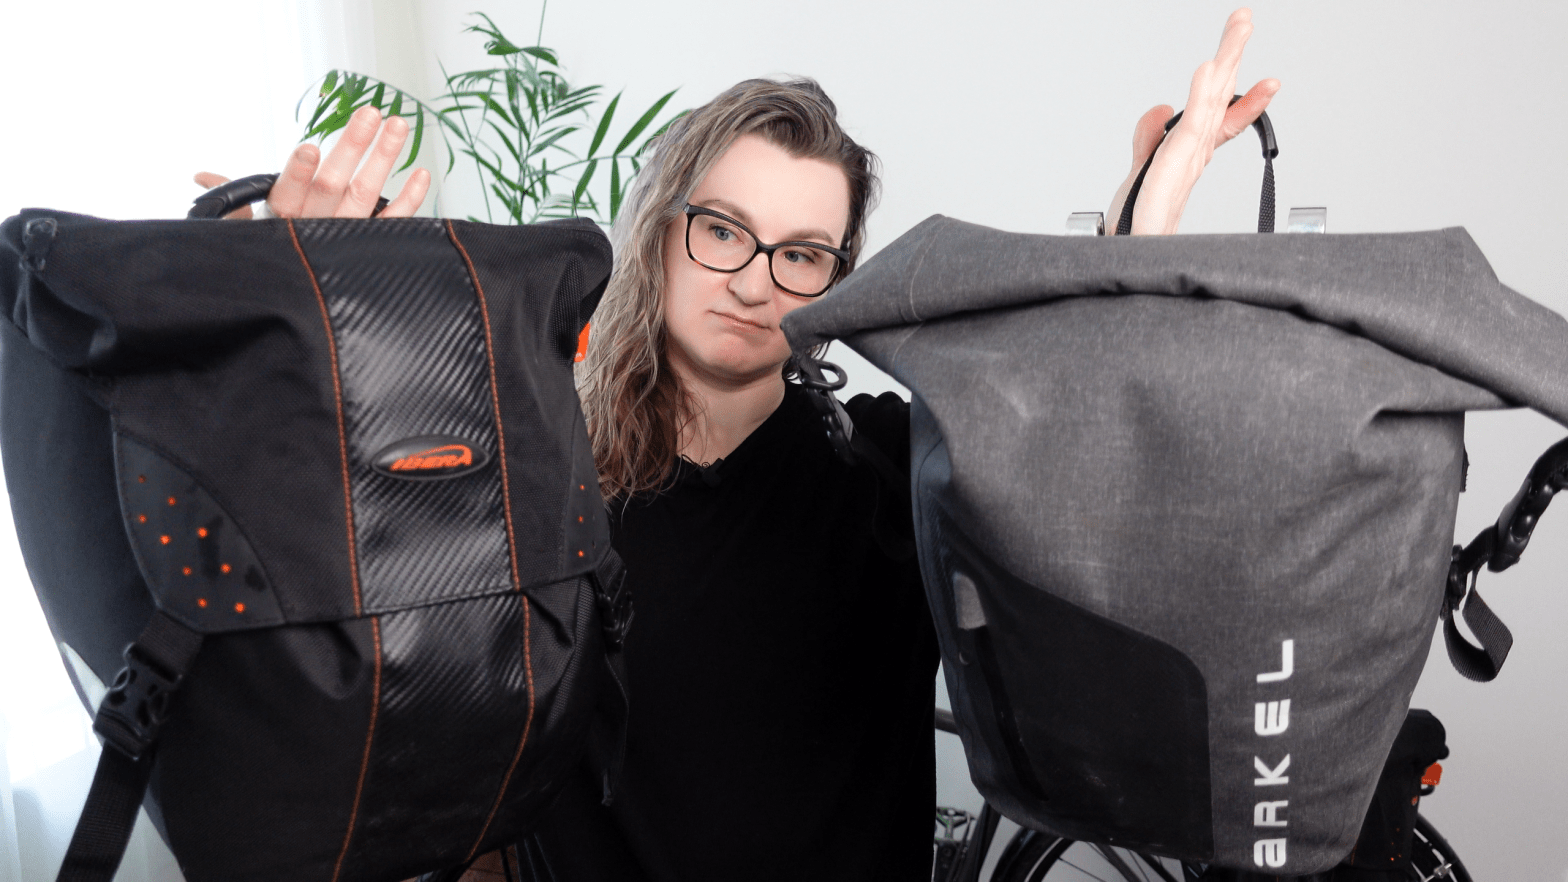
For example, my Arkel Orca 35L panniers have a plastic “shield” at the bottom of the pannier that protects the area from wear and tear caused by rubbing on the rear rack. On the other hand, my Ibera PakRak panniers have a plastic stiffener inside the pannier, but no additional reinforcing material on the outside. Details such as these will impact the longevity of the product.
An additional point to consider is whether you need organizational features – pockets. Do you need external or internal pockets, or are you OK without any organizational features? Do you need a laptop sleeve? Would you like for that sleeve to be removable? Do you need water bottle pockets? Do you have enough clearance for those on your bike? (make sure your foot doesn’t hit the pannier with any external bits attached). Figuring out your needs and wants will help you narrow down the best pannier for you.
Attachment System
There are a number of different attachment systems available on panniers, with the most common ones being hooks. Some attachment systems are fully adjustable, like Arkel’s cam lock, others offer limited or no adjustability. Consider the rack you are going to be using the pannier and if the pannier will fit the rack.
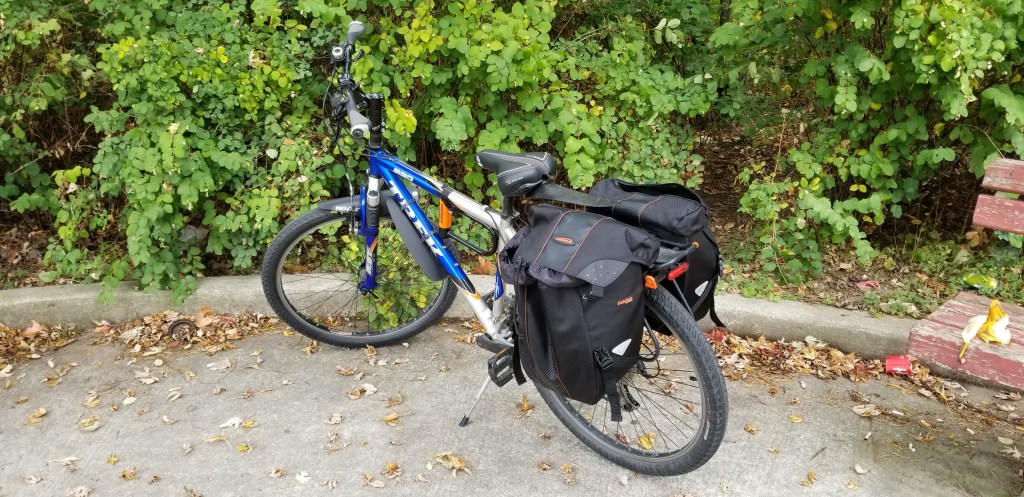
My first commuting setup on a Trek bicycle
For my very first commuting setup, I ended up buying both the rack and the panniers to make sure everything fit well. The Ibera PakRak panniers have one hook that adjusts horizontally or vertically, and while this is limiting, it worked well on the Ibera rear rack. What I found is that the panniers don’t install well on other racks due to their inability to adjust.
An additional point to consider is the durability of the hardware used. Are the components made from cheap plastic, or are the components made from robust materials? The attachment system is one of the most important components on the pannier as that is what will keep the bag attached to your bike, and your contents secure. You don’t want the pannier flying off your bike mid-ride.
Warranty and Repair Services
If you want to keep your panniers for a long time, you may need to dip into potential warranty claims or seek repair services for the bags. Are those available, and how easy is it to reach out to the brand reps? For example, the Ibera warranty process is slightly more convoluted than the Arkel one. Additionally, the Ibera warranty is a limited 2-year warranty that is only available for the original owner, whereas the Arkel warranty is a lifetime warranty and can be transferred if you decide to sell the panniers. This is another piece to consider when you decide to spend your money on a product.
In Conclusion
The points in this post were ones I should have considered when buying my first set of paniers, but in reality, I saught the collective experience of Amazon.ca in deciding on my first set.
I’d love to hear from you – what do you consider when buying new panniers? What is important to you?
Thanks for reading!
⚠ Some links in this post are affiliate links, which means that I will get a small commission if you make a purchase. This is at no additional cost to you.
If you are new to bicycle touring, you are bound to make mistakes. In fact, I think that making mistakes is the best way to learn and experience growth. If you are not making mistakes, then you’re probably staying within your comfort zone, and complacency is never a good thing.
I typically ride solo and self-supported while touring. I am relatively new to bicycle touring and I have made plenty of mistakes. Some small ones, some big ones that resulted in injury and an attempted bike theft. For me, my mistakes led to increased confidence as a cycle tourist, as I am able to better predict and navigate through various situations.
I did not eat enough – did not fuel my body enough
Five MORE Mistakes I Made on my Bicycle Tours
In my most recent video, Five MORE Mistakes I Made on my Bicycle Tours, I document mistakes I made on my solo, self-supported tours in 2021. Here’s a list of 5 (with a bonus):
I did not account for reroutes (and ended up with extra mileage and unplanned riding time)
I didn’t check the riding surface (and ended up on bikepacking/mountain bike trails)
I trusted locals’ advice on route planning from (and ended up on a high speed traffic road)
I started my day too late (and ended up riding in the dark)
I did not lock up my bike (and someone attempted to steal it)
BONUS: I did not trust my intuition
I’d love to know from you – what mistakes did you make while on tour and what did you learn from them?
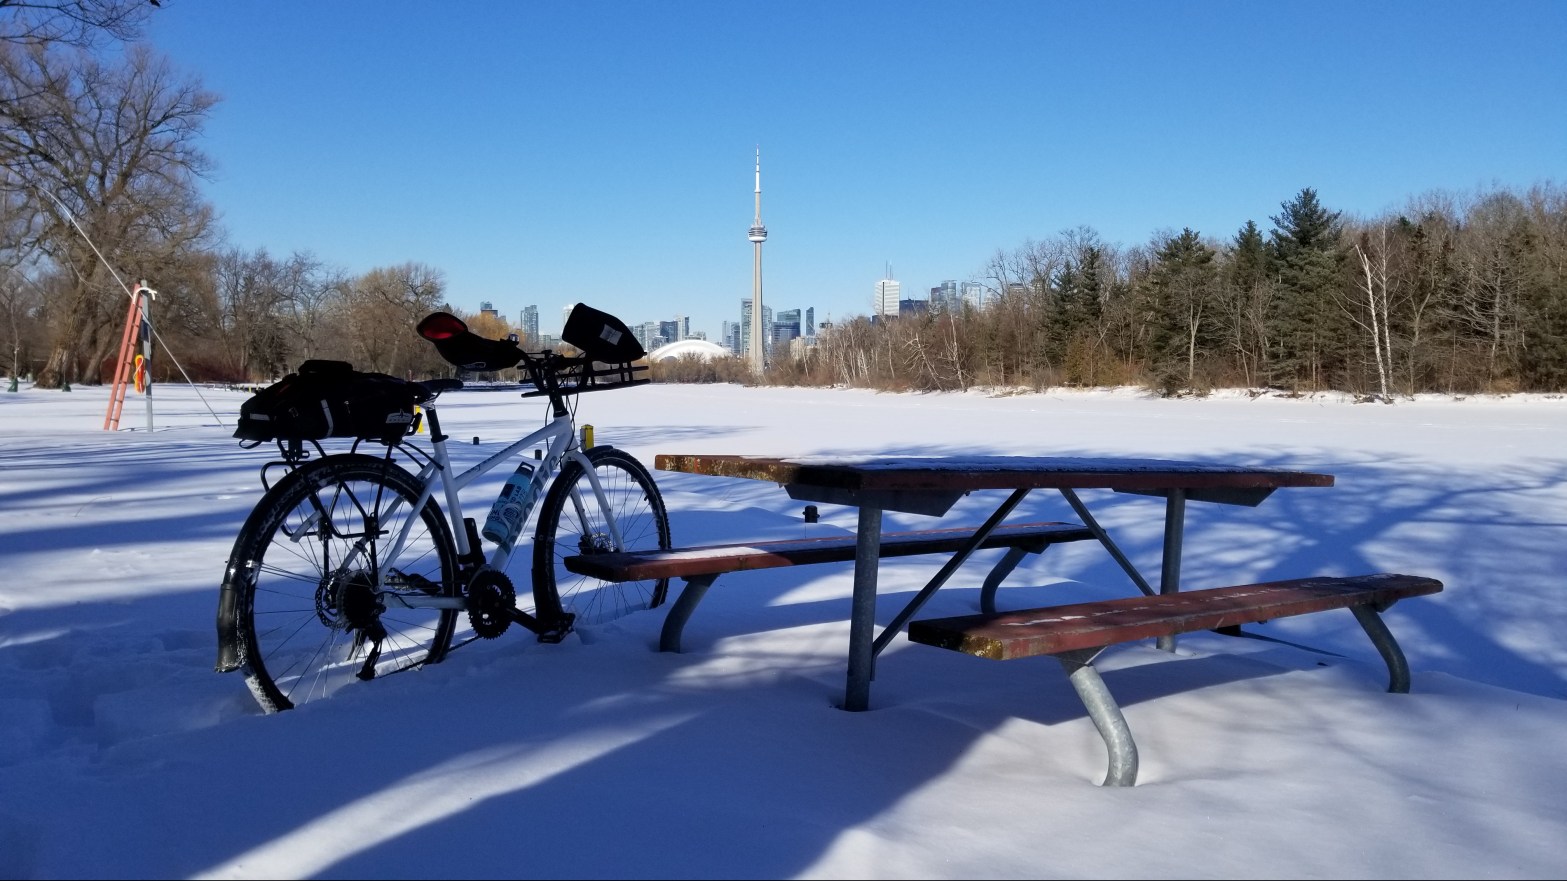
Toronto Islands in the Winter: My Annual Bike Ride
Toronto Islands – the City’s best-kept secret, especially in the Winter. Located across from downtown Toronto, the Islands, there are 15, are a peaceful place to visit. The distance on the islands is about 5 km in length, and the area is flat. A perfect location for beginner cyclists, as the Islands are car-free (service vehicles do operate on the Islands).
To get across, refer to the ferry schedule for the Ward’s Island ferry, which is the only operational ferry in the Winter. You can buy your ticket at the ferry terminal, or purchase it online.
In this video, I took a ferry to Wards Island and spent two hours riding around, visiting various places.
Today’s ride was easy going. The Erie Canal Trail was mostly unpaved crushed gravel and hugged the shores of the Canal. There were very few other cyclists riding this section, and the small villages that I passed, were quiet, due to it being a Sunday of a long weekend.
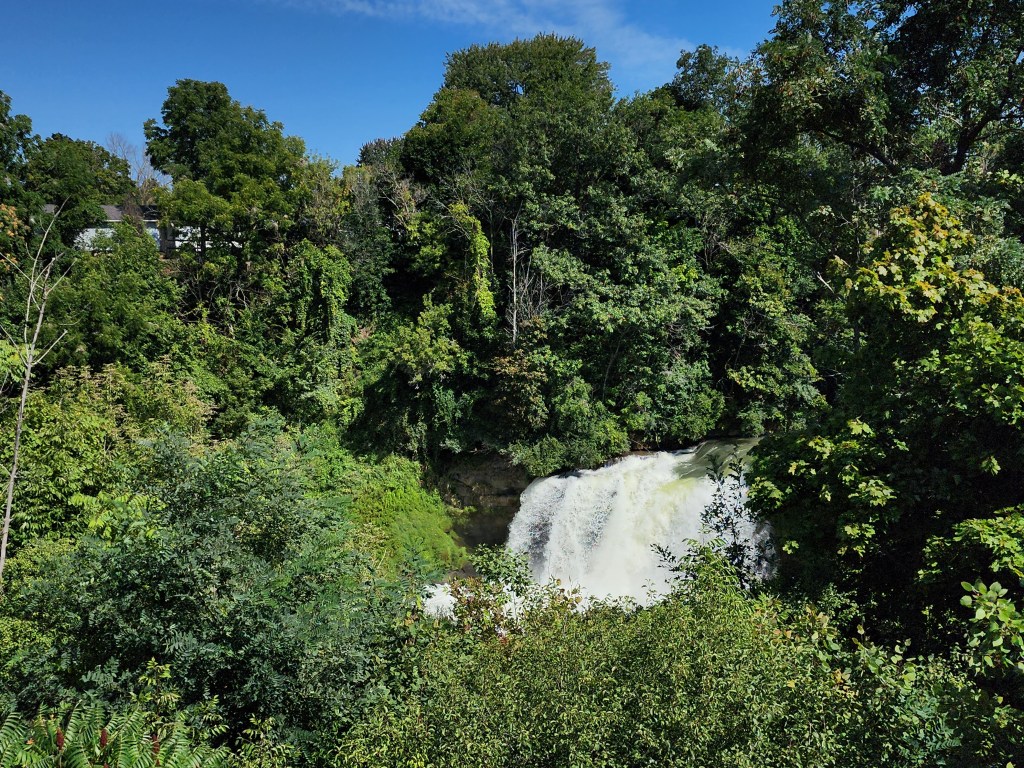
One of the highlights of today was seeing the Medina waterfalls right from the trail. Right around the waterfalls the trail is very rough and it is recommended that cyclists walk their bikes. So the view of the falls is a beautiful reward for a bit of a rough ride.
Medina Falls – view from the Eerie Canal Trail
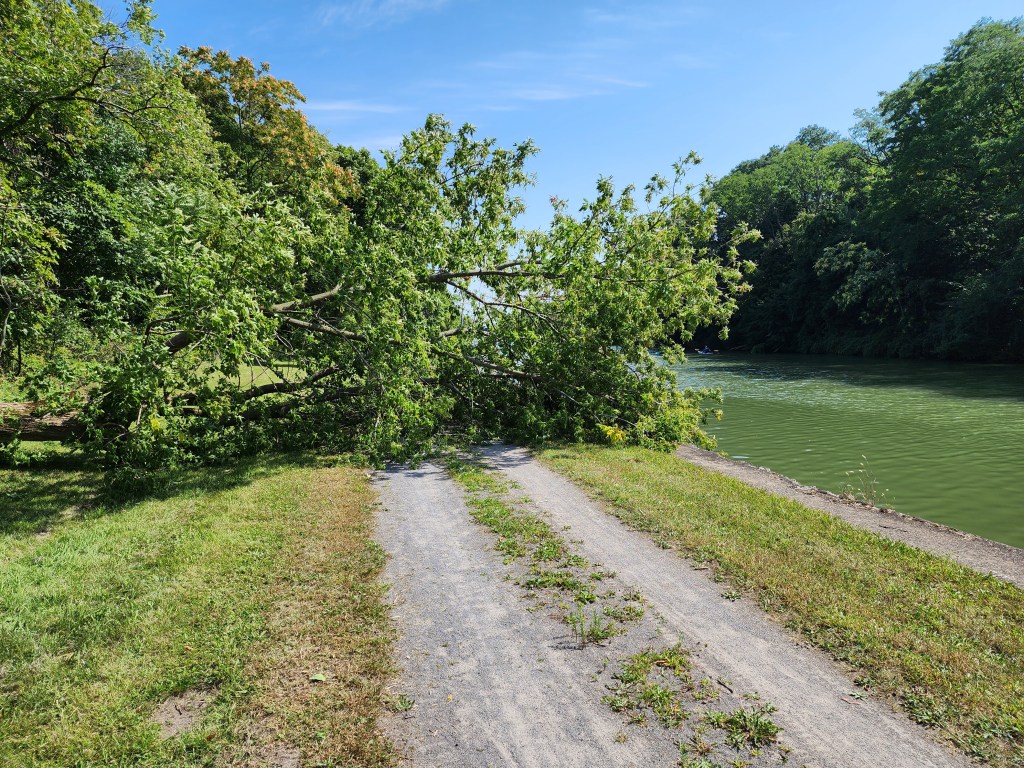
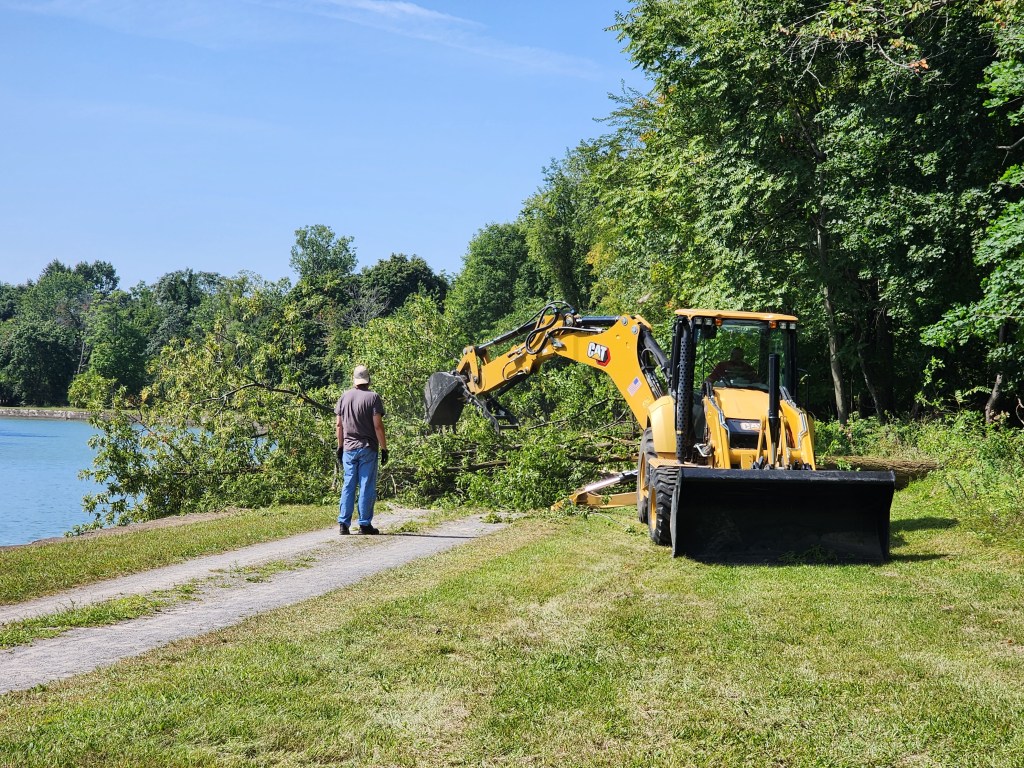
A bit further down the trail I came upon a fallen tree. Now, the trees along the Erie Canal are mature trees, so this fallen tree was blocking the entire trail. I had to take everything off the bike and carry the bike over the tree. Just as I had done so, I saw a flurry of activity ahead and that turned out to be two trail maintenance employees who were contacted by someone who let them know that a tree was down and blocking the canal trail. They moved the tree and cleared the pathway shortly thereafter.
Fallen tree blocks the trailCrews working on removing the tree
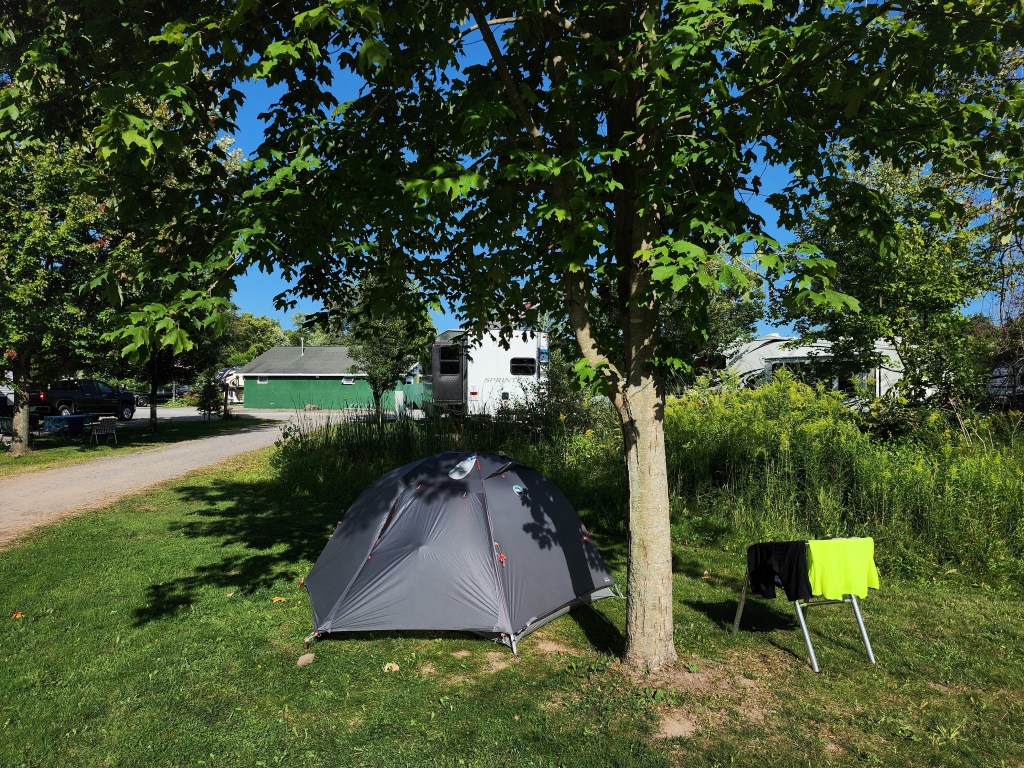
Today I camped at the Red Rock Ponds RV resort. They have an area designated for cyclists who are riding the Erie Canal and it is a grassy area close to their maintenance buildings. The grassy area is also very close to a comfort station that has washrooms, showers and laundry, there is also a power outlet in the vicinity and drinking water. The campground is beautifully maintained, the washrooms are very clean, and the staff highly welcoming. I would absolutely recommend this campground for anyone who is interested in staying outside of Albion. They do suggest you call and book ahead, but seeing as I was the only cyclist who stayed there, if you show up, they will most likely accommodate you.
Camping at the Red Rock Ponds RV resort
Overall, today was a bit of a monotonous ride. The Erie Canal Trail from Lockport to Holley is exposed, there isn’t much shade, which is something that is important to keep in mind. Today’s weather was unusually sunny and hot, and it was difficult to stay cool as there was nowhere to hide from the scorching sun.
However I loved being accompanied by butterflies as opposed to mosquitoes and black flies, and enjoyed watching boats pass me by along with multiple wildlife, birds, geese and ducks all enjoying the Erie Canal.
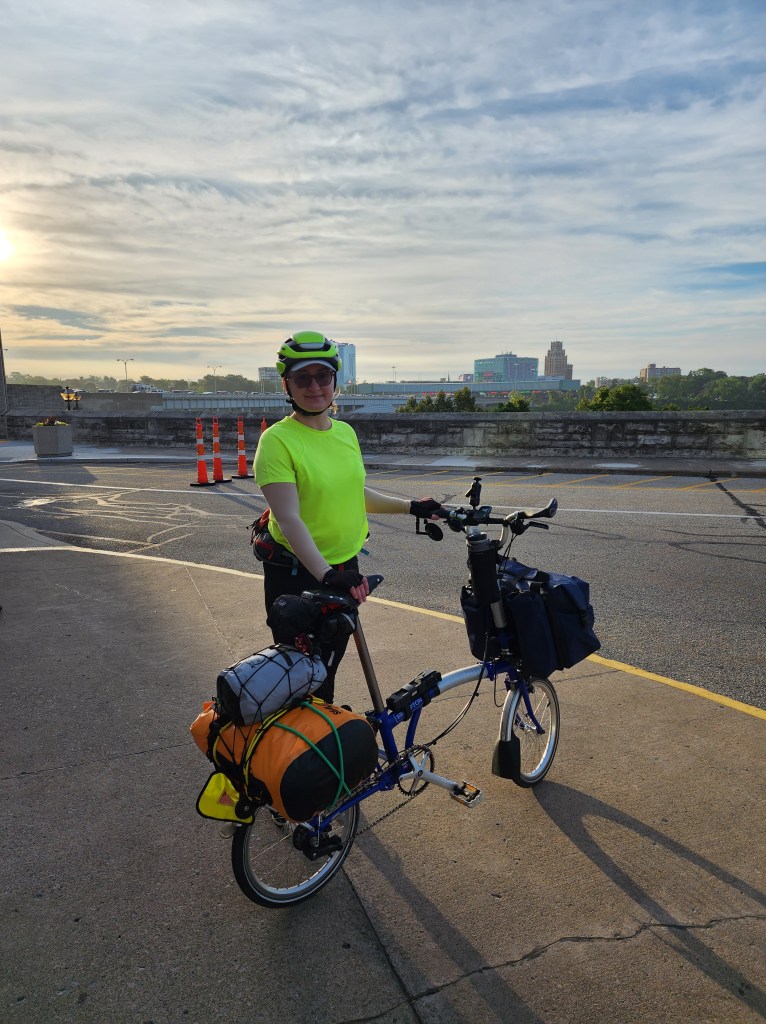
My day started at 4:30 a.m.. I got up, got ready, had breakfast and then my parents dropped me off in Niagara Falls, outside of the duty free shop. My 11-day adventure was about to begin.
I left my touring bike, the Kona Sutra, at home and instead took the Brompton C Line on this trip. The Brompton is a folding bike, it’s not necessarily a touring bike, but as they say, you can tour on any bike. Because this is my very first Brompton tour, I set my daily distance limit to about 50 km, which split the Erie Canal route to an 11-day journey.
All packed up and ready to go
Because we left so early there was very little traffic towards Niagara Falls, but as we got to the border crossing itself, a lineup of cars was already there. Unfortunately the Rainbow Bridge crossing in Niagara Falls doesn’t allow bicycles in the pedestrian crossing. I had to line up with cars. There are signs inside the building stating that you are not allowed to enter with a bicycle.
Bicycle signs inside the border crossing building (Canadian side)
All in all, the crossing took about 30 minutes and it was very smooth.
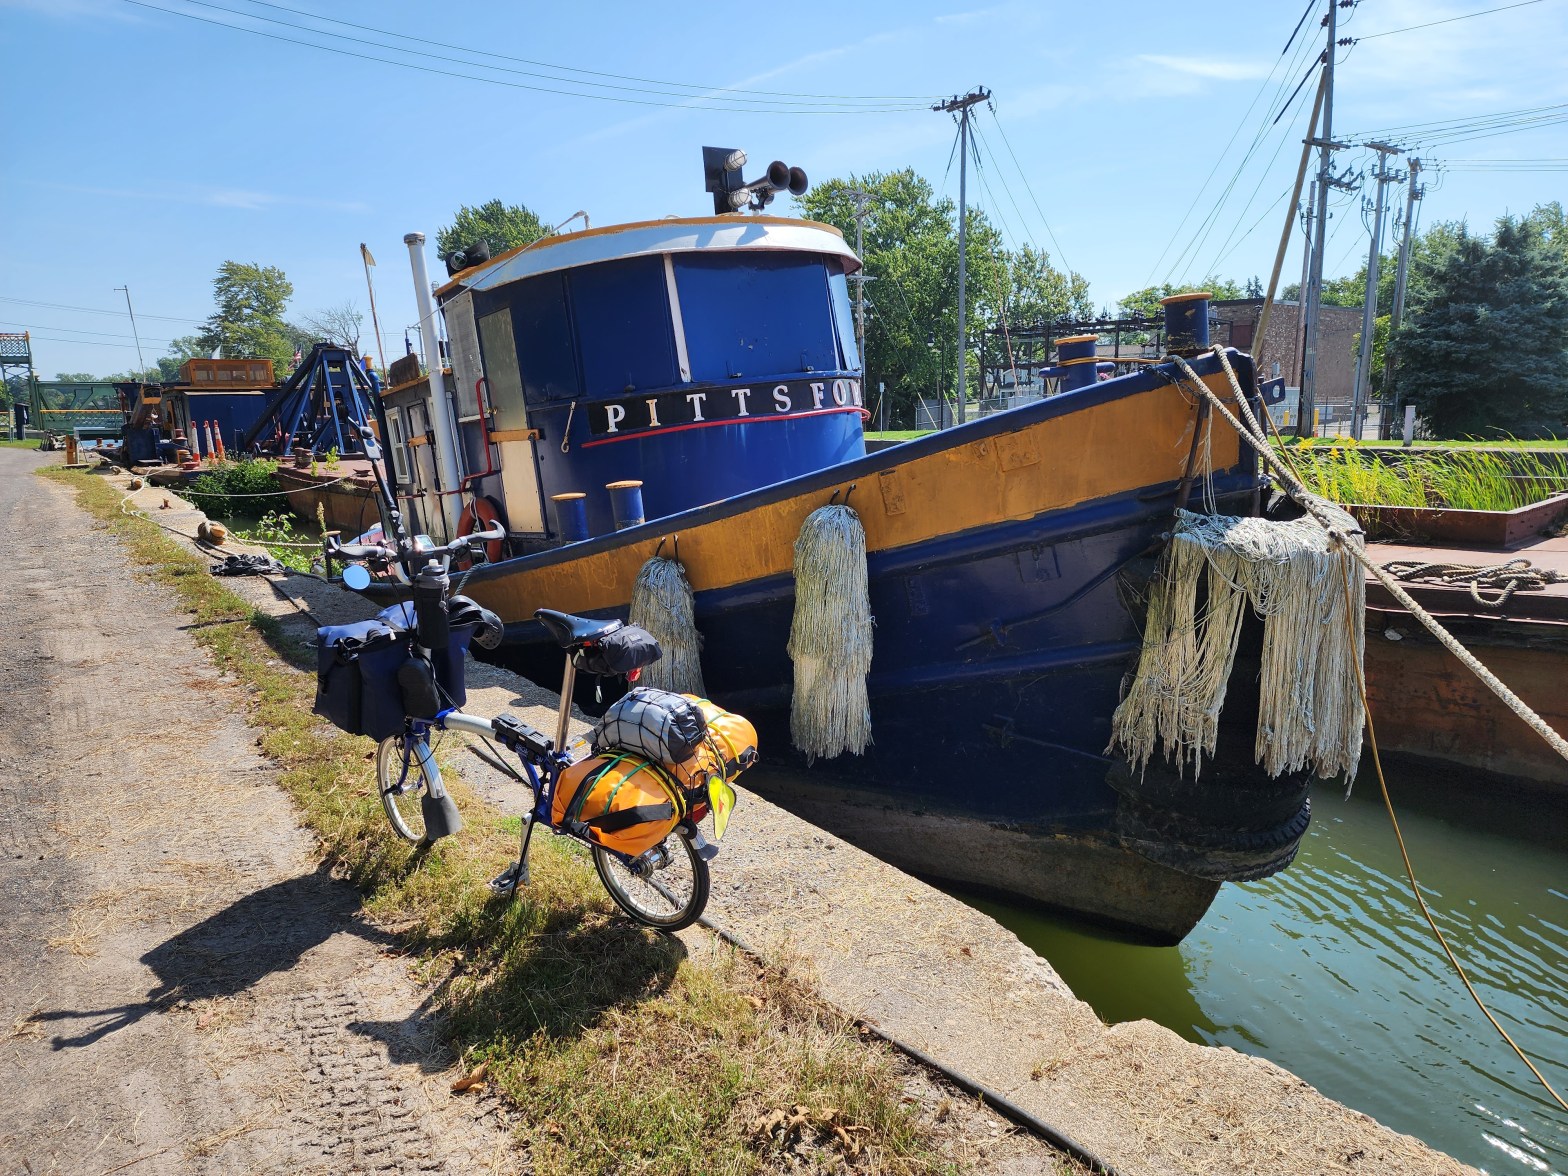
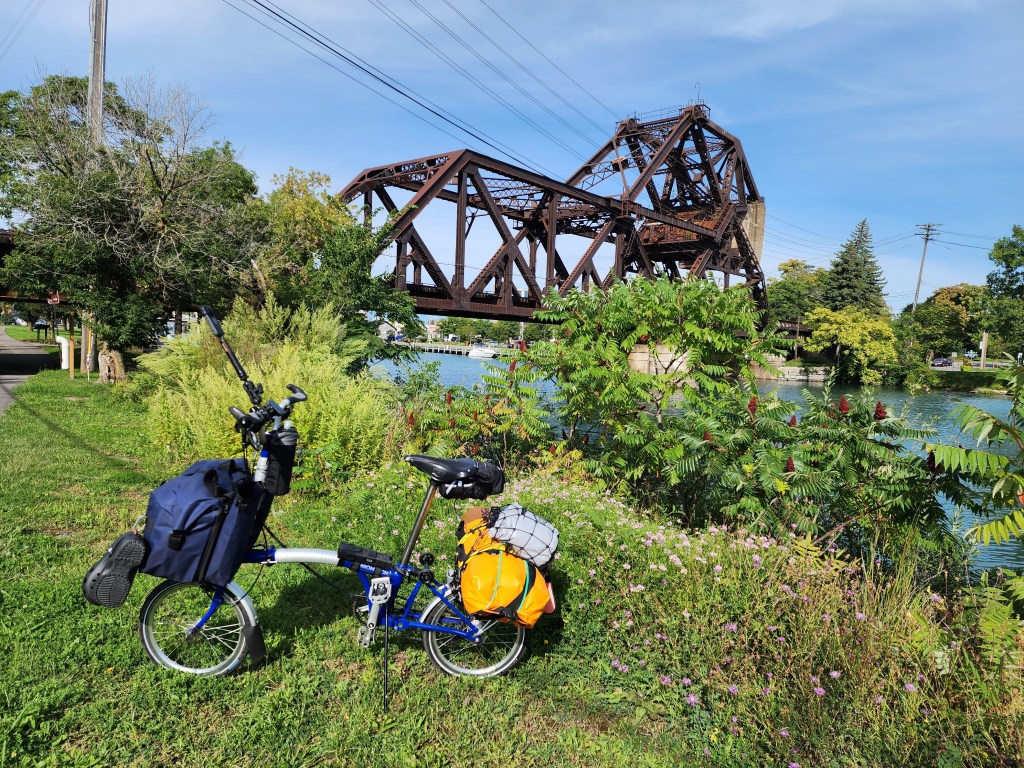
I rode from Niagara Falls and I joined the Erie Canal Trail in the town of Tonawanda, New York. The Eerie Canal Trail is pretty flat and on this day I rode on mostly paved sections. There was some meandering through residential streets but most of the time the trail was separated and hugged the Erie Canal, which allowed for beautiful views.
Brompton and an old bridge across the Eerie Canal
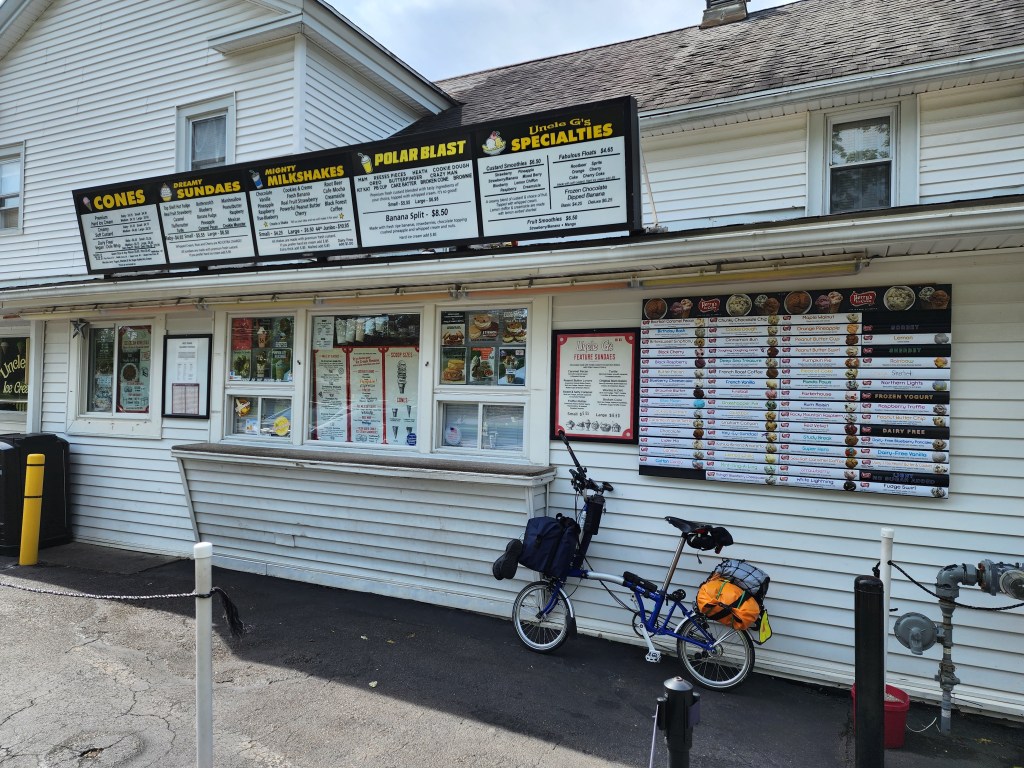
On the way to Lockport I passed through Pendleton, where I stumbled upon Uncle G’s ice cream shop. Unfortunately I was too early, the place opened at 12:00. However, I spoke to the staff who were already inside, and they opened the place up a little bit earlier and I had two scoops of delicious ice cream. Uncle G’s ice cream is a great stop if you’re riding the Erie Canal trail.
Brompton in front of Uncle G’s and their extensive ice-cream flavour menu
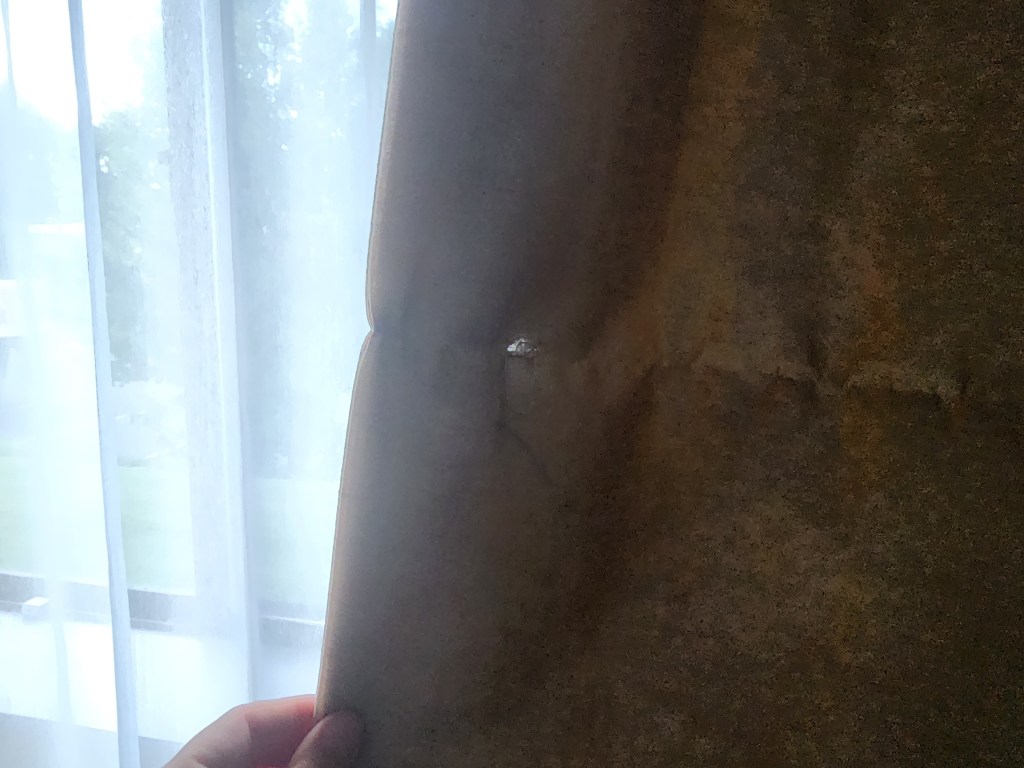
I arrived in Lockport at about 12:30 p.m. and that was way too early to check in to my motel. The motel I booked for today was Quality Inn motel, and based on my experience, this was money wasted. The room was very dated, there were stains on the couch, there were holes in the curtains, and the close to $300 that I paid for the night, because of a long weekend prime fee, was absolutely not worth it.
Stains on the couch, Quality Inn, LockportHoles in the curtains, Quality Inn, Lockport
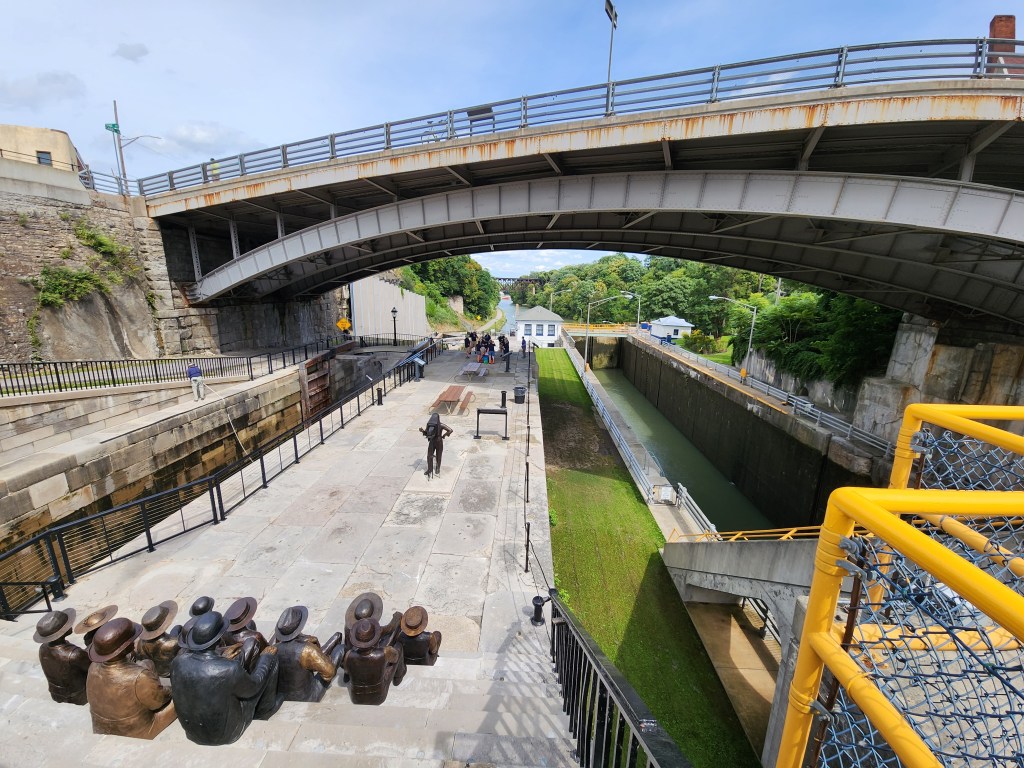
If you are staying in Lockport, and are riding self-supported, stay at the lock station. I spoke to the lock master as I toured the town of Lockport, and they mentioned that all you need to do to camp at a lock station is to roll up, speak to the lock master, identify that you wanted to camp at the lock station and they will set you up if they have space. The locks at Lockport have a historical side and an active side and it’s great to learn a little bit about the history of the town and the importance of the lock station.
Lockport locks
Once at the motel I unpacked, charged everything up, and then went grocery shopping to get myself ready for the next day.
So far, I am incredibly impressed with how the Brompton handles being loaded and riding longer distances. Because the front bag is attached to the frame, the handling of the bike is unaffected. My rear bag is a dry bag, and while it’s not ideal how it’s attached, it is working very well and does not make the bike unstable in any way. In fact, as I ride the bike, I do not feel the weight at all. There is about 20kg of weight on the bike.
Time will tell if I feel the same way on the last day of the trip, but so far so good.
Is Solo Bicycle Touring Scary? 5 Tips for Staying Safe on Solo, Self-Supported Tours
The most commonly asked question I am asked when I tell someone that I go on solo, self-supported tours is “Aren’t you scared?” And while I understand the sentiment, I often wonder if the question is driven by that person’s fears and some complacency, with some gender-driven bias mixed in.
Does bicycle touring bring with it some dangers? Of course it does, but it’s a matter of mitigating them. In this video, I identify some of the things I do to increase my personal safety and security while on tour.
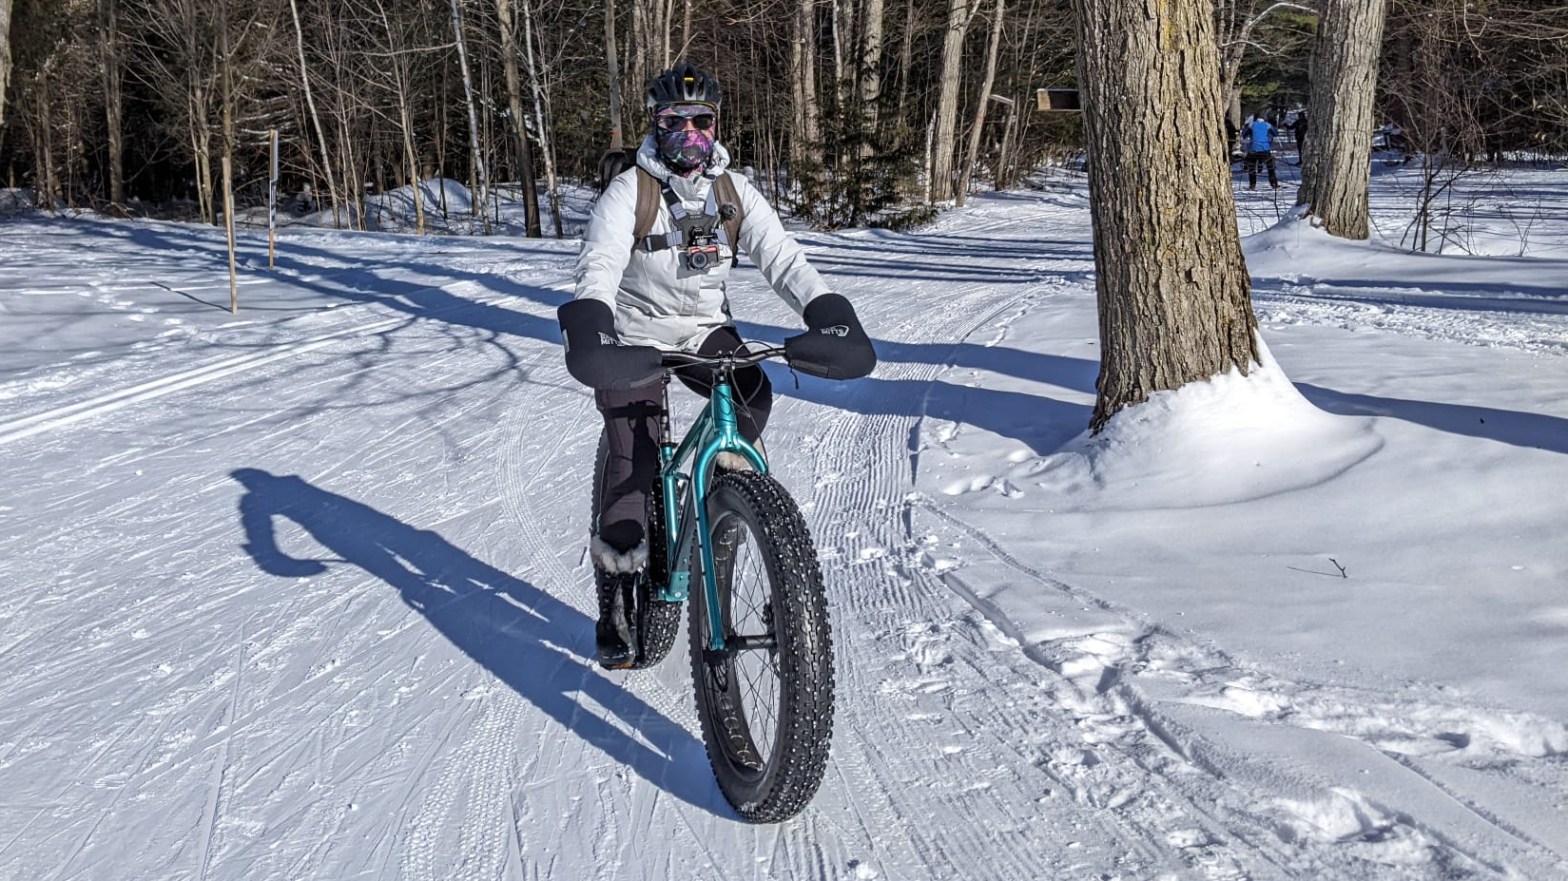
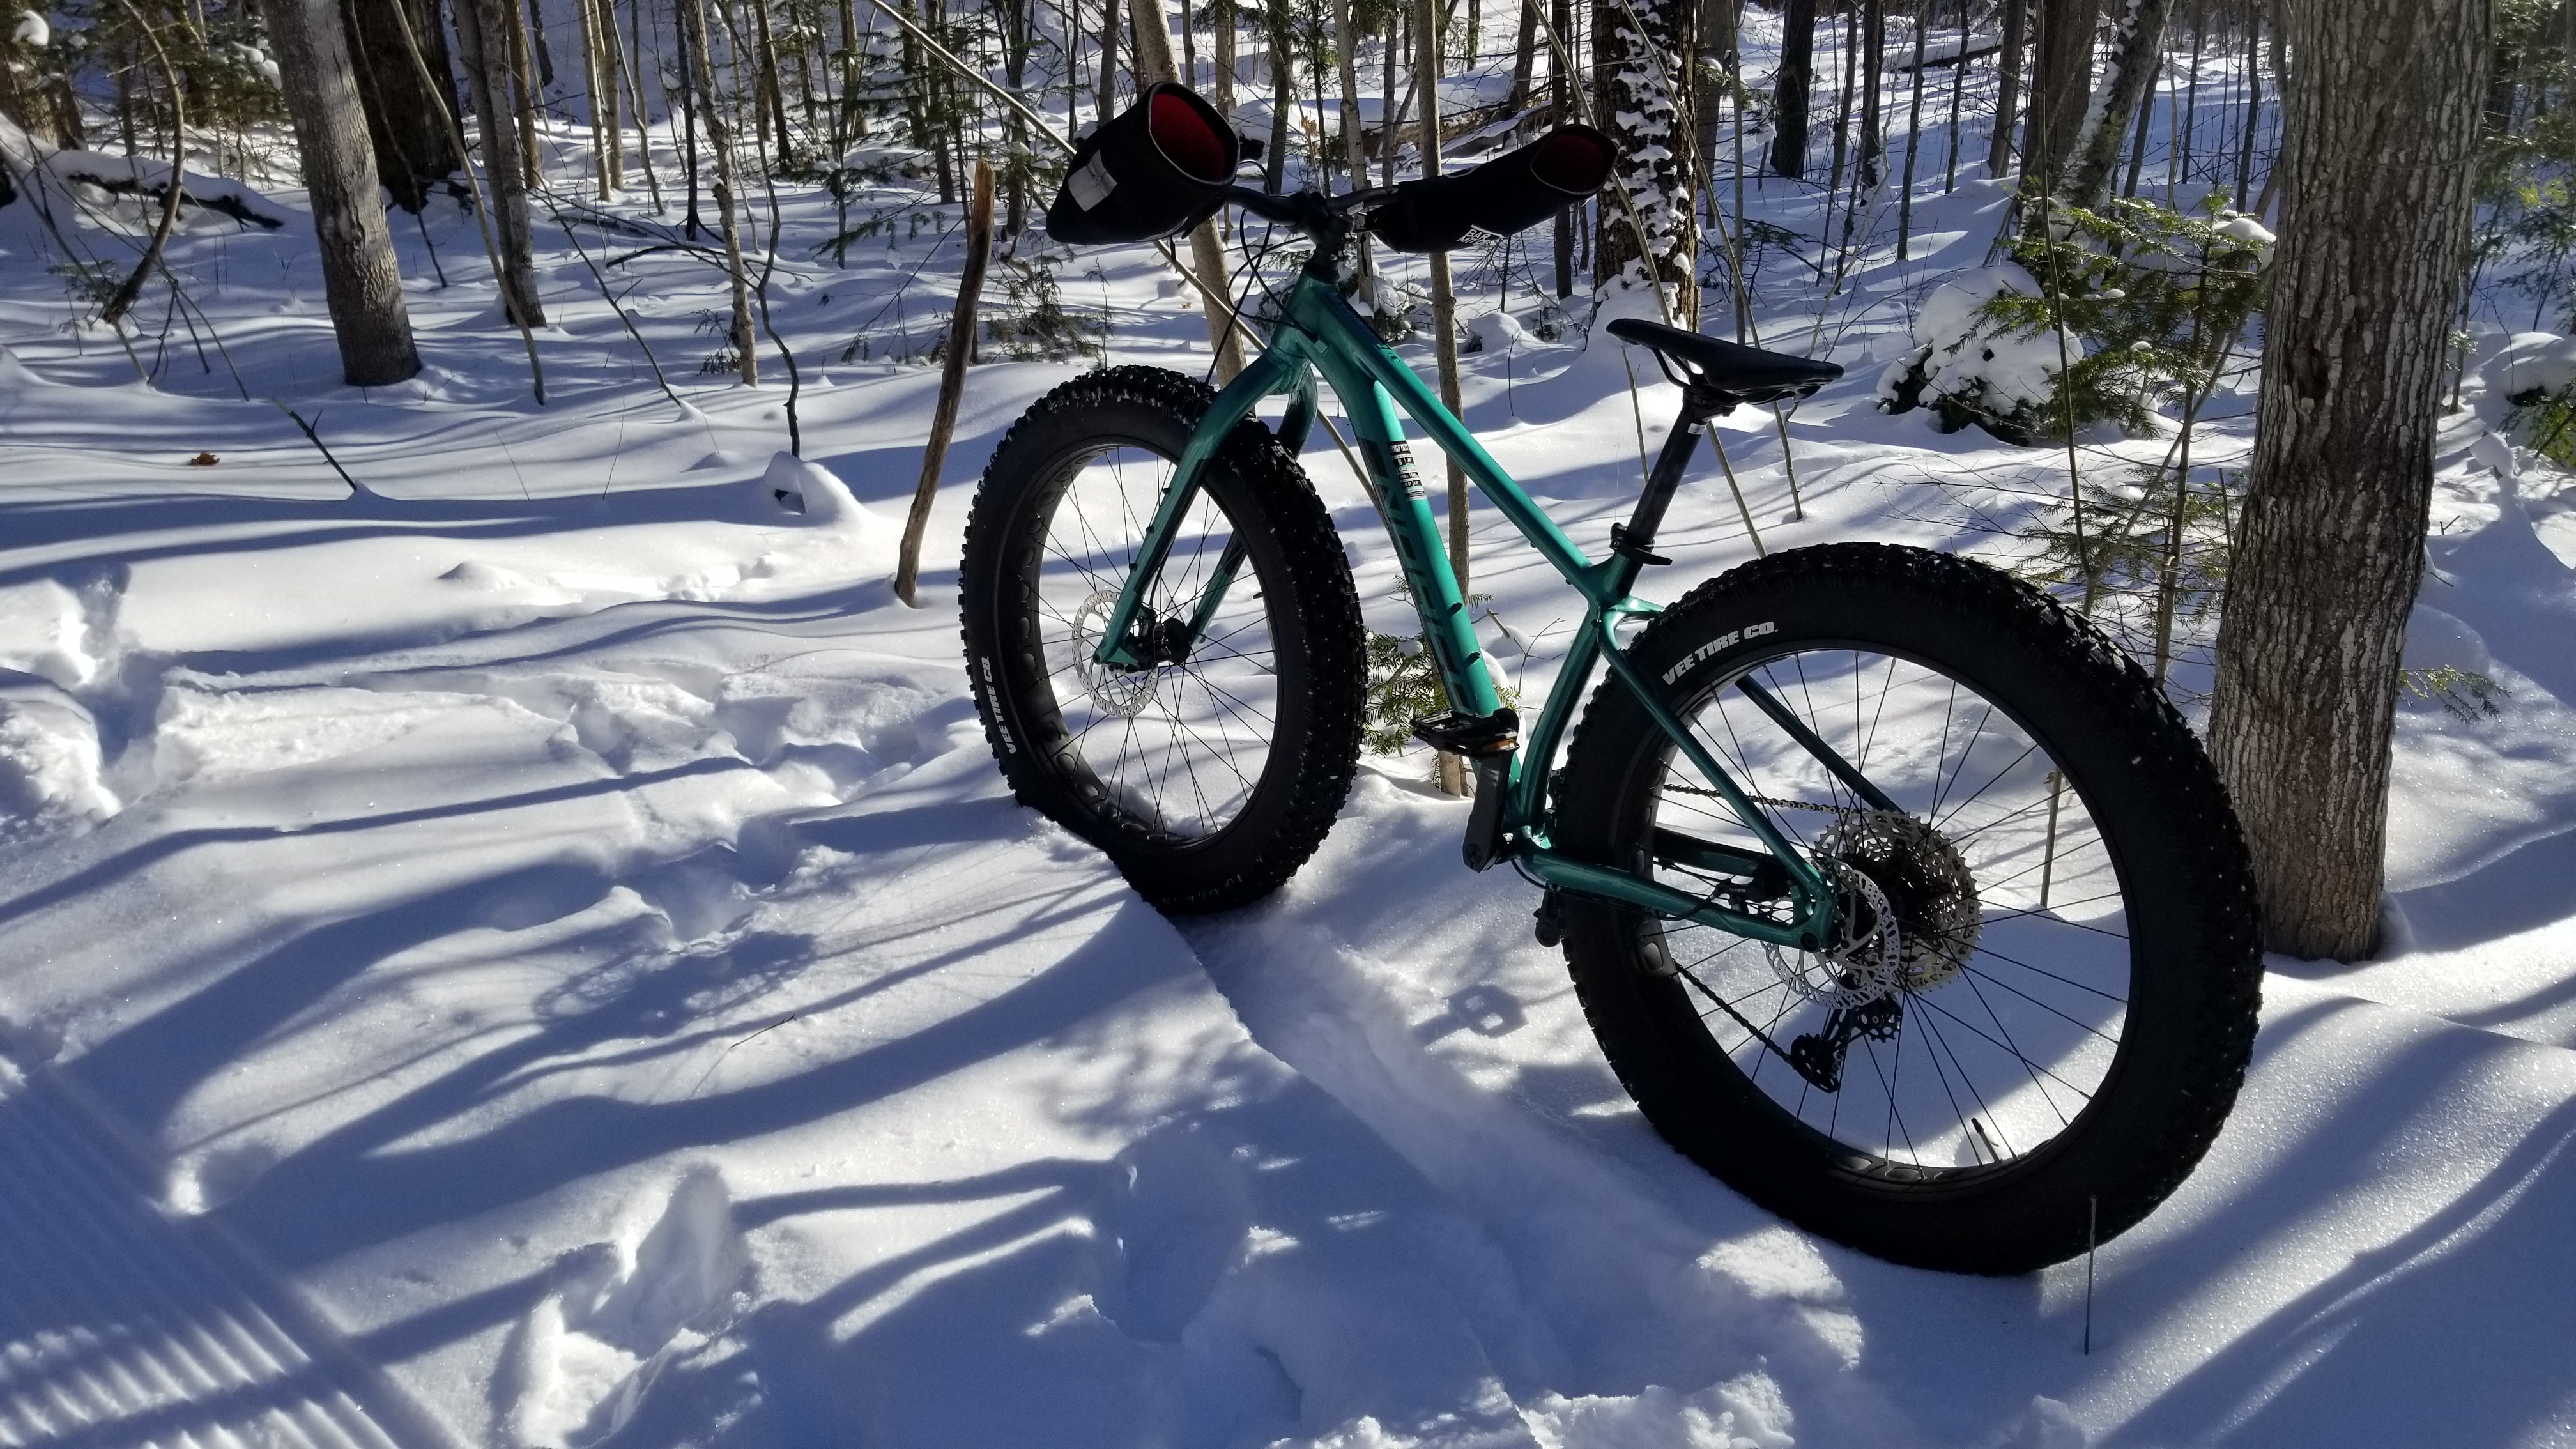
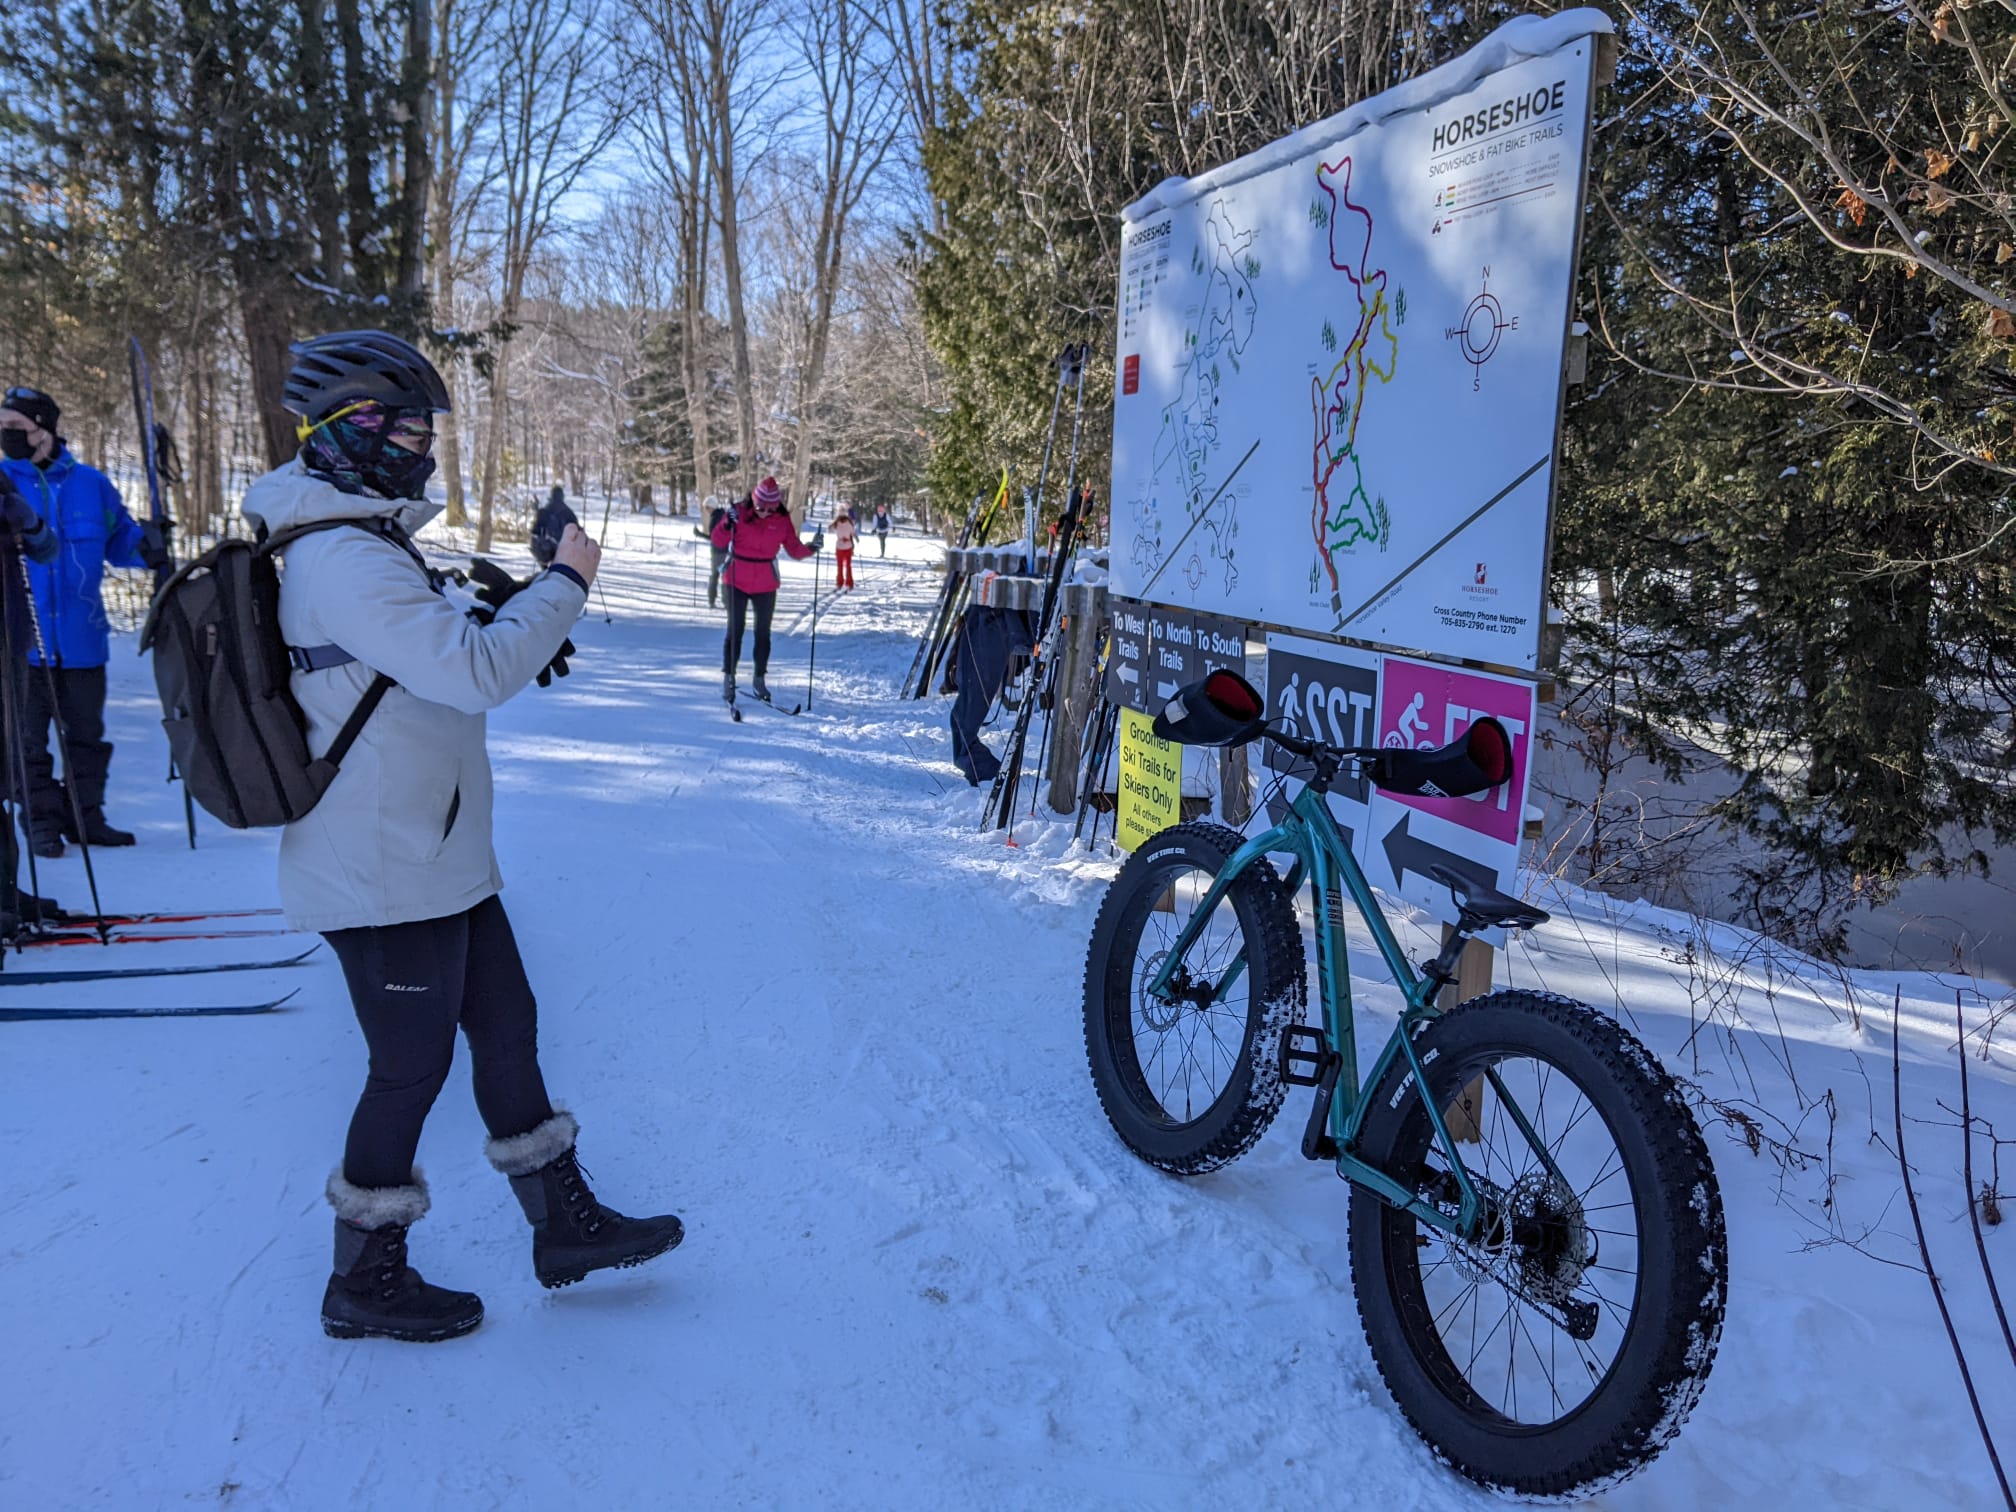
This adventure was three years in the making. My friend and I drove to the Horseshoe Valley Resort, rented the Norco Bigfoot 3 fat bikes and rode around the Copeland Forest on groomed trails. The weather was perfect for this adventure, but I still managed to fall multiple times. Fat biking on snow is a skill I have yet to develop.